Kube 101 Workshop
This is the workflow for the Kubernetes 101 Workshop.
Learning Objectives
During this workshop you’ll do the following things
- Create an IBM Cloud Account and Kubernetes Cluster
- Learn basic Conceptual Model of common Kubernetes Resources
- Build an application image
- Deploy application image to Kubernetes
- Explore lifecycle of pods
- Debug when things go wrong / break things to see common debug steps
- Upgrade application
Sample Application
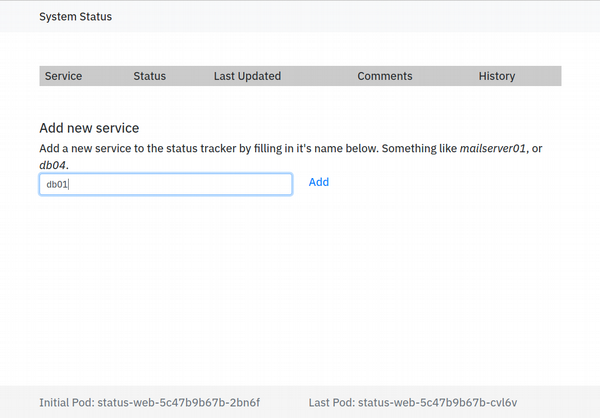
The sample application is a status page application that lets you record system status.
Prep-Work
Before completing the interactive portion of the workshop you’ll need to create an IBM Cloud Account using the instructions provided.
Deploying Your First App
Step 1: Clone Repo
git clone https://github.com/sdague/kube101-lisa
cd kube101-lisa
This contains the application code for the python app, as well as all the kubernetes configurations you’ll need.
Step 2: Build Image
First, we have to login to our environment:
ibmcloud login --sso
After doing that we need to create an image registry. In IBM Cloud you can have your own private image registry to build and store container images. This prevents anyone outside of your account from seeing these.
You must select a name for your image namespace, as these are globally
unique. Once you have selected it replace the $namespace in all
commands below with that value.
ibmcloud cr namespace-add $namespace
Next we build the image using IBM Cloud’s Image build farm. Remember
to replace $namespace with your chosen namespace.
ibmcloud cr build --tag registry.ng.bluemix.net/$namespace/web:1 status_page
Sending build context to Docker daemon   22.2MB
Step 1/11 : FROM ubuntu:18.04
18.04: Pulling from library/ubuntu
473ede7ed136: Pull complete
c46b5fa4d940: Pull complete
93ae3df89c92: Pull complete
6b1eed27cade: Pull complete
Digest: sha256:29934af957c53004d7fb6340139880d23fb1952505a15d69a03af0d1418878cb
Status: Downloaded newer image for ubuntu:18.04

...

Step 11/11 : CMD flask run -h 0.0.0.0
 ---> Running in 6c6b234b3af5
 ---> 0fafed49d891
Removing intermediate container 6c6b234b3af5
Successfully built 0fafed49d891
Successfully tagged registry.ng.bluemix.net/status_page/web:1
The push refers to a repository [registry.ng.bluemix.net/status_page/web]
54084949a5fc: Pushed
1b7b005ebbd4: Pushed
cdfea8cbb4bd: Pushed
76c033092e10: Layer already exists
2146d867acf3: Layer already exists
ae1f631f14b7: Layer already exists
102645f1cf72: Layer already exists
1: digest: sha256:bf0e91c99df7a67b8c83c4eea2d37bad65bca1ad7454812a068fbbe051a89851 size: 1785

OK
The Application Image
The following is the image file that we’re building.
FROM ubuntu:18.04

ENV DEBIAN_FRONTEND noninteractive
ENV LANG C.UTF-8
ENV LC_ALL C.UTF-8
ENV FLASK_APP status_page
ENV STATUS_PAGE_SETTINGS ../settings.cfg

RUN apt-get update && apt-get install -y python3 python3-dev python3-pip && apt-get clean

COPY ./ /var/www/status_page
WORKDIR /var/www/status_page

RUN pip3 install -U .

CMD flask run -h 0.0.0.0
This has a few basic container image stanzas:
- FROM - specify a base image, in our case a dockerhub ubuntu 18.04 minimal image
- ENV - specify environment variables. Many are needed for apt to run cleanly
- RUN - run a command. We do an apt install, as well as a pip install later
- COPY - copy files from the local directory into the image. This is how we load in our application.
- WORKDIR - set the working directory for the image
- CMD - what command should we run if nothing else is specified via kubernetes.
It is important that flask is passed the -h 0.0.0.0
argument. Without that, it would bind to localhost (i.e. 127.0.0.1),
which would not allow inbound connections.
Step 3: Connect to Kube Cluster
ibmcloud ks cluster-config kubelisa
Which returns something like
OK

The configuration for kubelisa was downloaded successfully. Export
environment variables to start using Kubernetes.

export KUBECONFIG=/home/sdague/.bluemix/plugins/container-service/clusters/kubelisa/kube-config-wdc06-kubelisa.yml
You must then run the export command to enable kubectl to access
your cluster. For the rest of this exercise we’ll be using kubectl
for almost all actions.
Step 4: Explore the cluster
A good starting point for the cluster is to look at all the resources:
kubectl get all -o wide
NAME                 TYPE        CLUSTER-IP   EXTERNAL-IP   PORT(S)   AGE       SELECTOR
service/kubernetes   ClusterIP   172.21.0.1   <none>        443/TCP   10d       <none>
A kuberenetes cluster starts with very little in it’s default namespace. There is just a single service for the kubernetes API itself.
Step 5: Deploying the Application
Note: you have to change your image url in the files to match you
chosen $namespace above.
Edit the deploy/status-deployment.yaml file and replace
status_page with your chosen $namespace:
...
    spec:
      containers:
      - name: status-web
        image: registry.ng.bluemix.net/status_page/web:1
        imagePullPolicy: Always
...
Then you can deploy the application:
kubectl apply -f deploy/status-deployment.yaml
deployment.apps "status-web" created
service "status-web" created
Then look at what happened:
kubectl get all -o wide
NAME                              READY     STATUS    RESTARTS   AGE       IP              NODE
pod/status-web-64474bccd5-btmn5   0/1       Running   0          33s       172.30.112.86   10.190.15.245
pod/status-web-64474bccd5-fwt5h   0/1       Running   0          33s       172.30.112.87   10.190.15.245
pod/status-web-64474bccd5-rjq44   0/1       Running   0          33s       172.30.112.85   10.190.15.245

NAME                 TYPE        CLUSTER-IP       EXTERNAL-IP   PORT(S)          AGE       SELECTOR
service/kubernetes   ClusterIP   172.21.0.1       <none>        443/TCP          10d       <none>
service/status-web   NodePort    172.21.161.127   <none>        5000:32101/TCP   33s       app=status-web

NAME                         DESIRED   CURRENT   UP-TO-DATE   AVAILABLE   AGE       CONTAINERS   IMAGES                                      SELECTOR
deployment.apps/status-web   3         3         3            0           33s       status-web   registry.ng.bluemix.net/status_page/web:1   app=status-web

NAME                                    DESIRED   CURRENT   READY     AGE       CONTAINERS   IMAGES                                      SELECTOR
replicaset.apps/status-web-64474bccd5   3         3         0         33s       status-web   registry.ng.bluemix.net/status_page/web:1   app=status-web,pod-template-hash=2003067781
Connect to Application
Once the application is deployed, we can connect to it. Because we are using a NodePort we need to run a couple of commands to determine the url for the application.
kubectl get nodes -o wide
NAME            STATUS    ROLES     AGE       VERSION       EXTERNAL-IP    OS-IMAGE             KERNEL-VERSION      CONTAINER-RUNTIME
10.190.15.245   Ready     <none>    10d       v1.10.8+IKS   169.61.97.62   Ubuntu 16.04.5 LTS   4.4.0-137-generic   docker://17.6.2
The import information here is the EXTERNAL-IP.
kubectl get service -l app=status-web -o wide
NAME         TYPE       CLUSTER-IP       EXTERNAL-IP   PORT(S)          AGE       SELECTOR
status-web   NodePort   172.21.161.127   <none>        5000:32101/TCP   13m       app=status-web
Here we need the 2nd port listed under ports. That’s what’s exposed to the outside world.
The above would give us a URL of http://169.61.97.62:32101.
Did it work?
Discovering what’s going on
Run the following command again:
kubectl get pod -l app=status-web -o wide
NAME                          READY     STATUS    RESTARTS   AGE       IP              NODE
status-web-64474bccd5-btmn5   0/1       Running   0          18m       172.30.112.86   10.190.15.245
status-web-64474bccd5-fwt5h   0/1       Running   0          18m       172.30.112.87   10.190.15.245
status-web-64474bccd5-rjq44   0/1       Running   0          18m       172.30.112.85   10.190.15.245
What’s going on in that READY field? Why aren’t any of our services
ready?
Let’s start with looking at one of the pods and see if we can see:
kubectl describe pod/status-web-64474bccd5-rjq44
...
Events:
  Type     Reason                 Age                 From                    Message
  ----     ------                 ----                ----                    -------
  Normal   Scheduled              21m                 default-scheduler       Successfully assigned status-web-64474bccd5-rjq44 to 10.190.15.245
  Normal   SuccessfulMountVolume  21m                 kubelet, 10.190.15.245  MountVolume.SetUp succeeded for volume "default-token-hsk5t"
  Normal   Pulling                21m                 kubelet, 10.190.15.245  pulling image "registry.ng.bluemix.net/status_page/web:1"
  Normal   Pulled                 21m                 kubelet, 10.190.15.245  Successfully pulled image "registry.ng.bluemix.net/status_page/web:1"
  Normal   Created                21m                 kubelet, 10.190.15.245  Created container
  Normal   Started                21m                 kubelet, 10.190.15.245  Started container
  Warning  Unhealthy              1m (x119 over 21m)  kubelet, 10.190.15.245  Readiness probe failed: HTTP probe failed with statuscode: 500
Ah, we’re failing a readiness probe. Because we’re failing readiness, the pods in question aren’t being added to the service pool, and thus there is nothing to answer the incoming requests.
If we look at our deployment yaml we’ll see that we included a readiness check
...
    spec:
      containers:
      - name: status-web
        image: registry.ng.bluemix.net/status_page/web:1
        imagePullPolicy: Always
        env:
          - name: REDIS_HOST
            value: "redis-leader"
        ports:
        - name: http
          containerPort: 5000
          protocol: TCP
        readinessProbe:
          httpGet:
            path: /readiness
            port: 5000
The reason the readiness probe is failing is that the redis datastore that’s needed for the application hasn’t been deployed. We can fix that in our next step.
Step 6: Deploy Datastore
In order to fix the application, you need to deploy the redis deployment as well, then look at the results after.
kubectl apply -f deploy/redis-deployment.yaml
kubectl get all -o wide
NAME                                  READY     STATUS    RESTARTS   AGE       IP              NODE
pod/redis-follower-78fbffc9db-5tf6m   1/1       Running   0          9s        172.30.112.89   10.190.15.245
pod/redis-follower-78fbffc9db-g6k6h   1/1       Running   0          9s        172.30.112.90   10.190.15.245
pod/redis-leader-56dcffbb55-gjqrg     1/1       Running   0          9s        172.30.112.88   10.190.15.245
pod/status-web-64474bccd5-btmn5       0/1       Running   0          31m       172.30.112.86   10.190.15.245
pod/status-web-64474bccd5-fwt5h       0/1       Running   0          31m       172.30.112.87   10.190.15.245
pod/status-web-64474bccd5-rjq44       1/1       Running   0          31m       172.30.112.85   10.190.15.245

NAME                     TYPE        CLUSTER-IP       EXTERNAL-IP   PORT(S)          AGE       SELECTOR
service/kubernetes       ClusterIP   172.21.0.1       <none>        443/TCP          10d       <none>
service/redis-follower   ClusterIP   172.21.208.184   <none>        6379/TCP         9s        app=redis,role=follower
service/redis-leader     ClusterIP   172.21.199.58    <none>        6379/TCP         9s        app=redis,role=leader
service/status-web       NodePort    172.21.161.127   <none>        5000:32101/TCP   31m       app=status-web

NAME                             DESIRED   CURRENT   UP-TO-DATE   AVAILABLE   AGE       CONTAINERS       IMAGES                                      SELECTOR
deployment.apps/redis-follower   2         2         2            2           9s        redis-follower   redis:5.0-rc                                app=redis,role=follower
deployment.apps/redis-leader     1         1         1            1           9s        redis-leader     redis:5.0-rc                                app=redis,role=leader
deployment.apps/status-web       3         3         3            1           31m       status-web       registry.ng.bluemix.net/status_page/web:1   app=status-web

NAME                                        DESIRED   CURRENT   READY     AGE       CONTAINERS       IMAGES                                      SELECTOR
replicaset.apps/redis-follower-78fbffc9db   2         2         2         9s        redis-follower   redis:5.0-rc                                app=redis,pod-template-hash=3496997586,role=follower
replicaset.apps/redis-leader-56dcffbb55     1         1         1         9s        redis-leader     redis:5.0-rc                                app=redis,pod-template-hash=1287996611,role=leader
replicaset.apps/status-web-64474bccd5       3         3         1         31m       status-web       registry.ng.bluemix.net/status_page/web:1   app=status-web,pod-template-hash=2003067781
You can see that the status application will start to go READY after the redis deployment is up and READY. Readiness checks happen every 10 seconds so it will take a little bit of time before it’s detected.
The application will now work.
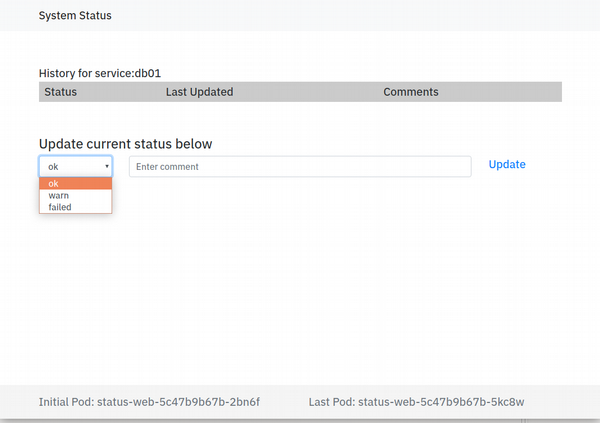
Step 7: System Status Application
You can now use the application. The front page allows you to add services, and the service specific page allows you to add statuses. You can keep the application up in multiple tabs and see it refreshing in near real time.
Step 8: Pod Lifecycle - Recovering from Failures
It’s worth experiencing the deployment recovery of pods on your own. One way to do this is to delete one of our status-web pods. Pick one of them out of the list and do a delete like follows:
kubectl delete pod/status-web-64474bccd5-btmn5
kubectl get all -o wide
NAME                                  READY     STATUS              RESTARTS   AGE       IP              NODE
pod/redis-follower-78fbffc9db-5tf6m   1/1       Running             0          13m       172.30.112.89   10.190.15.245
pod/redis-follower-78fbffc9db-g6k6h   1/1       Running             0          13m       172.30.112.90   10.190.15.245
pod/redis-leader-56dcffbb55-gjqrg     1/1       Running             0          13m       172.30.112.88   10.190.15.245
pod/status-web-64474bccd5-bllzb       0/1       ContainerCreating   0          1s        <none>          10.190.15.245
pod/status-web-64474bccd5-btmn5       1/1       Terminating         0          44m       172.30.112.86   10.190.15.245
pod/status-web-64474bccd5-fwt5h       1/1       Running             0          44m       172.30.112.87   10.190.15.245
pod/status-web-64474bccd5-rjq44       1/1       Running             0          44m       172.30.112.85   10.190.15.245
...
You’ll see that there is a terminating pod, and immediately a new ContainerCreating pod.
Lessons Learned
We learned about the following in this section
- Kuberenetes Deployments / Pods / Services
- It’s YAML all the way down
- Readiness Checks ensure application is exposed to user only when ready
- Deployments provide very basic HA/restart for services
- kubectl describe provides events which are good for debugging
Upgrade and Debug
One of the most import parts of application lifecycle is what do
upgrades look like. Applications that are deployed as Kubernetes
deployments automatically are upgraded by a rolling upgrade
strategy, that has some safeguards.
To see these in action we’ll do an upgrade, but we’ll also make sure it goes wrong the first time.
Step 1: Make a Bad Image
First we’ll have to edit our code to make it invalid python. We can do
this by modifying status_page/status_page/view.py and adding a bad
line near the top such as import noimport. Any other python error is
fine as well.
After we do this, lets rebuild the image, giving it a new version: 2.
ibmcloud cr build --tag registry.ng.bluemix.net/$namespace/web:2 status_page
Step 2: Upgrade Image
We can now upgrade the application to use this new image. Edit
deploy/status-deployment.yaml to reference :2 instead of :1.
Then run:
kubectl apply -f deploy/status-deployment.yaml
kubectl get pods -l app=status-web
NAME                          READY     STATUS    RESTARTS   AGE
status-web-64474bccd5-bllzb   1/1       Running   0          1h
status-web-64474bccd5-fwt5h   1/1       Running   0          2h
status-web-64474bccd5-rjq44   1/1       Running   0          2h
status-web-b65fd45f6-nrntw    0/1       Error     3          1m
We can see that the pod with the new image went into an error state, and because it did, the existing application was left running. So a bad software push was prevented from taking down our application.
Step 3: Finding out what’s wrong - logs
We can use the built in kubernetes logging facility to inspect the broken pod. This is a common way of discovering what is wrong with an application.
kubectl logs status-web-b65fd45f6-nrntw
 * Serving Flask app "status_page"
 * Environment: production
   WARNING: Do not use the development server in a production environment.
   Use a production WSGI server instead.
 * Debug mode: off
Usage: flask run [OPTIONS]

Error: While importing "status_page", an ImportError was raised:

Traceback (most recent call last):
  File "/usr/local/lib/python3.6/dist-packages/flask/cli.py", line 235, in locate_app
    __import__(module_name)
  File "/var/www/status_page/status_page/__init__.py", line 19, in <module>
    import status_page.views  # noqa
  File "/var/www/status_page/status_page/views.py", line 5, in <module>
    import noimport
ModuleNotFoundError: No module named 'noimport'
And we can see the application crash there. It is easy in this case to
resolve this issue by removing our broken line, and creating a new
image :3 that fixes things.
After you do this you’ll see something like follows:
kubectl get pods -l app=status-web
NAME                          READY     STATUS        RESTARTS   AGE
status-web-64474bccd5-bllzb   1/1       Terminating   0          1h
status-web-64474bccd5-fwt5h   1/1       Running       0          2h
status-web-64474bccd5-rjq44   1/1       Running       0          2h
status-web-666d49df6c-bxvzn   1/1       Running       0          10s
status-web-666d49df6c-rfbzf   0/1       Running       0          7s
status-web-b65fd45f6-nrntw    0/1       Terminating   5          5m
The :2 image based pod is terminated, we don’t want any of those out
there. An image :3 based pod is rolled out, and once it goes into a
Running and READY state the system starts cleaning up the image :1
pods, replacing them one by one.
Step 4: Interactive Debug
The is one last tool to put in your toolkit, interactive debugging. Some times you just need to get on a pod and get yourself oriented about the ways that the runtime is different than you imagine. Maybe a network path isn’t clear, or a hostname is resolving in a way you don’t expect.
For those times you can run:
kubectl -it exec status-web-666d49df6c-bxvzn bash
And it will drop you into an interactive shell on that pod. It’s important to know this is for orientation only. Any changes to container images done in this way will be reset if that pod goes away. This isn’t how you fix issues, it’s how you inspect the environment to figure out why it’s not matching the model you have in your head.
Final Thoughts
Kubernetes is a system based on the extracted patterns of container management from many cloud providers. It puts many best practices into the platform, such as health checks, rolling upgrades, and consistent event and logging capture.
We have only scratched the surface here, but this hopefully provides you a solid base to explore Kubernetes further.